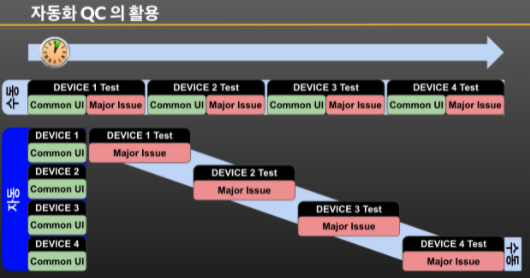
The built game will be distributed to each store on the platform after verifying that all UIs and contents are working properly through a step called QC Test before release. Until now, testers have checked a series of processes from normal download of builds to termination of apps, and have consumed tens of minutes to hours of test labor depending on the platform and device types supported by the game’s scale.
QC automation was developed in script form to provide the tester with the basis for determining whether a typical menu button works, processing repetitive test items that were executed per build in a short time, allowing the tester to focus on Major Issues.
Not all test items can be dependent on Automation QC. Typical test items in the game, for example, the areas of manual and automatic can be distinguished as follows:
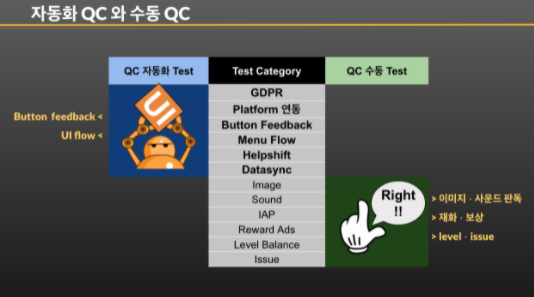
Automation QC tests whether the menu’s sequential input and next steps are successful in accordance with the user’s Play Flow or UI Flow, and manual QC can focus on major issues such as reading, payment, and reward of visual resources such as images, production or sound.
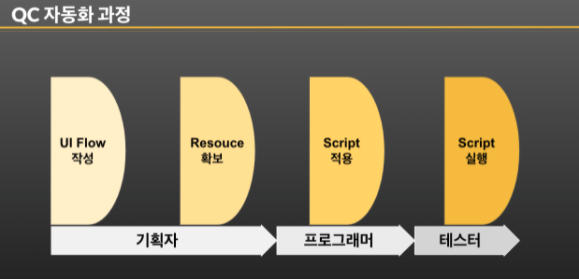
The process of automating QC can be largely divided into four stages. Document the UI Flow, which defines all processes that require Input as Step, as shown in the reference figure below. The Step 2 <Resource Acquisition> process cuts out the original size button image for each step and stores it step by step. Next, register the resources in order in Step 3 <Script>. Finally, when you <Run> the Script, you will run an automated QC test from Download to Install > Run > Input > • • • > Exit > Results Report.
The test is conducted in the following structure:
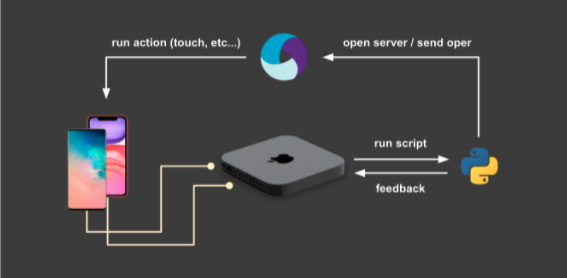
Open the Appium server on the device (PC) to which the mobile device is connected and interact with the device through its port. The python script runs on the PC, and interactions such as pressing a button based on the QC checklist json file of the project to conduct QC are initiated.In the process, a log is left for each UI you press, and screenshots are automatically taken for each step and saved separately.
Screen shot the entire screen, find the UI you want through openv, and touch input with web driver. If the accuracy (similarity) of the result found through openv is less than 0.5, it is judged that it is not the image you want to find, and the location of the screenshot you took with the error log. Of course, there is also an option to skip the error log even if you can’t find it.